Continuous delivery for node apps in azure
This post describes how you can test, build and deploy a JavaScript app which required external tooling to build (such as Ember, Gatsby or Create React App) to Azure websites as simply as possible.
Whilst the Azure documentation claims to be able to do this, every time I've tried many hours have been lost trying to debug kudu configs with zero success.
The aspiration
- Create a Github webhook triggering a build and deploy on merged PR into master
- A remote build of the app so we don't need to do that locally on each change
- A remote deployment of the application to an Azure website
Enter Wercker
Wercker is a cloud hosted CI/CD tool which is currently free to use. Wercker uses a yaml configuration file to define your pipelines and a concept of workflows to tie those pipelines together.
For example you might have a test and deploy pipeline which you want to execute when files are pushed to your repository.
You can also hook Wercker into GitHub so that pipelines are run a pre-cursor to allowing a pull request to be merged, commonly your test step.
Creating a project
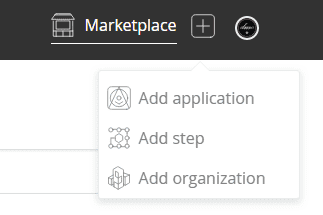
First, create an account on Wercker, then create an application by clicking add application in the top right.
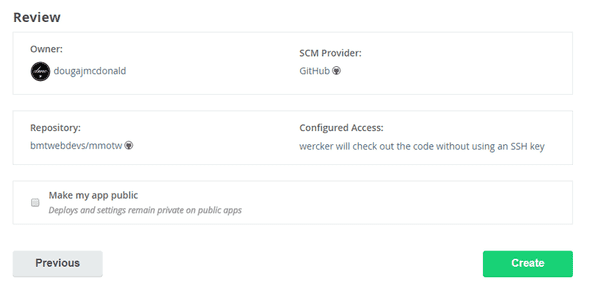
Next tell Wercker where the project lives, (Wercker currently integrates with GitHub, GitLab and Bitbucket). Once you've selected your source control provider, you can find your repository in the list and click through the remaining options. Finally you will see a review page which looks like this.
This project will act as the container for your workflows and a workflow is where you define the pipeline you want to run in response to an event in GitHub.
Setting up a workflow
Next you need to setup a workflow, click on the workflow tab in Wercker and you will probably see a default workflow and a pipeline below both called build. If you do, click on the build pipeline and rename it to something like deploy.
A workflow is a collection of one or more pipelines, and a pipeline is set of steps in a wercker.yml which describes a process you wish wercker to perform.
Wercker.yml config
Now we can configure our app to tell it how to build and deploy our app. You do this by adding a wercker.yml file to the root of your repository and adding a series of steps which form a pipeline, let's look at the wercker.yml for this website.
box: node
deploy:
  steps:
    # build the site with gatsby
    - script:
      name: gatsby build
      code: |
        npm install -g gatsby-cli
        npm install
        gatsby build

    # deploy to azure
    - wercker-labs/azure-ftp-deploy:
        cwd: public/
        publish-url: $publish_url
        username: $username
        password: $password
So what's going on here? wercker uses Kubernetes under the hood to containerise your build but we don't need to worry the details, we start by telling wercker what box to use. In our case it's a box which contains node.
Build the site
We can then see a the pipeline step we called deploy.
NOTE: The step here must match the name you gave your pipeline in Wercker.
Next we have two steps denoted by a minus - and the indentation level.
The first is a script step with three commands called gatsby build. It first installs the gatsby-cli (this could equally be create-react-app, ember-cli or similar) which is the tooling you need to actually build your site.
We then run a simple npm install to add our dependencies and finally gatsby build to produce our build output. Note how similar this is to how you might build your site locally, ensuring the context switch from your local machine to your build environment is minimal.
Deploy to Azure
Our second step, is from the Wercker Step Registry where you can find many pre-written steps available for free. It's called wercker-labs/azure-ftp-deploy and as you might guess from the name, we use to deploy to Azure via FTP. The cwd parameter tells the step where to find the content we want to transfer to Azure which in the case of gatsby is the public folder, this might be your build or dist folder depding on what your using.
The other three parameters are the FTP publish url, username and password to use for the transfer.
You can get these values from the publish profile in Azure either via powershell or by logging into the Portal selecting your app service and finding the link at the top.
Note: If your username is awesomeapp\$awesomeapp Azure will allow awesomeapp as the username, to avoid Wercker issues with the special characters.
Secrets
You'll notice in the wercker-labs/azure-ftp-deploy step we don't provide any real values. The reason for this is that we want the wercker.yml to sit in source control and this in the case of GitHub would be publicly accessible.
Instead of the real values, we can use environment variables which are denoted by the $ prefix and we can then use Wercker to provide these when it executes the workflow at build time.
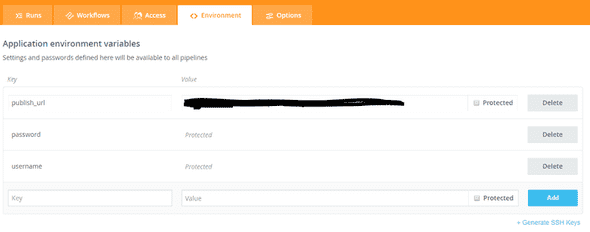
You can add secrets in Wercker by going to the Environment tab and adding the three keys publish_url, username and password as shown below.
You can select protected for your sensitive informaton so that no one can see the values through the UI which I would recommend for almost all values. Out of paranoia I scrubbed out the FTP publish URL, you never can be too careful!
Triggering a build
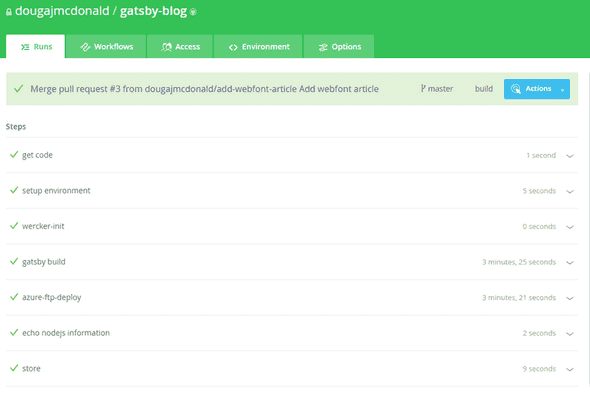
Last off, push something to you master branch (ideally via a PR as it's a protected branch right?) and you should then see Wercker spin up and begin executing the steps we defined which will give your output like this.
It's pretty good at reporting debugging info, so if you hit any snags it should be fairly straightforward to see what happened.
Summary
The simplicity with which you can setup this process (literally 11 lines of .yaml) compared to this equivalent kudu script the automatic hook into Github and the clear effective UI within Wercker make this deployment method straightforward but also versitle. With very limited changes I have successfully used Wercker to deploy ember, gatsby and create react app to Azure without any problems but changing as little as a couple of npm commands in the config.
I would recommend you try this method if you are spending any of your time messing with Kudu scripts or trying to extract the logs from Azure scm to find out what went wrong!


